General Pages Setup
|
|
Did you know you can use the Community Builder General Pages modules to create nicely formatted image links to virtually any content?
|
For all of these tasks you will first need to:
-
Login to your Community Builder admin account.
|
|
Since General Pages are a plugin module it must be turned on in order for the links to appear on the page.
|
-
Click the (Patron Site Configuration Options) button.
-
Click the (Patron Account Config. Plugins) button.
-
Click the row with [PatronGeneral.asp].
-
Filter on rows [Center Column = N] This will filter the results to show only the rows where the plugin is NOT turned on in the center column for the page PatronGeneral.asp.
-
Click the row with [General].
-
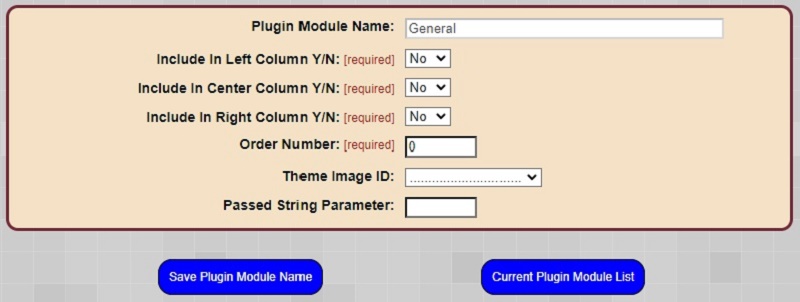
This is the page where you will turn on the General Page plugin module on the PatronGeneral.asp page.

-
Select Yes from the Include in Center Column Y/N drop down list.
-
Set the Order Number field to 1.
-
Click the (Save Plaugin Module Name) button.
|
|
To setup a General Page you first must setup the topics for your General Page(s) since a topic is a required value when setting the nav bar tab options:
|
-
Click the (Setup General Pages) button.
-
Click the (Setup a General Page Topic) button.
-
This is the page where you will enter the topics for a General Page.
A topic is the overall general area of interest of the content for the general page.
Examples of General Page topics might be, robotics, financial information, a sports team, bicycling, etc. The point is to keep the topic broad but specific to the subject matter of the General Page.
Categories can be applied to each General Page link so that you can break down the broad topic into more specific categories. Using categories people will be able to filter the links based on category.
An example of Topic and related categories could be:
Topic: Robotics Events
Category 1: Robotics Exhibition
Category 2: Movie Replica Robots
Category 3: Kid Friendly Events

-
Topic Name: Enter a name for the topic.
-
Topic Text: Enter the text that will appear in the header on the General Page.
-
Click the (Create New General Page Topic) button.
-
To create multiple General Page topics click the (Current General Page Topic List) button.
-
Click the (New General Page Topic) button and repeat the process.
|
|
To setup categories within each General Page topic:
|
-
Click the (Setup General Pages) button.
-
Click the (Setup a General Page Category) button.
-
This is the page where you will enter the categories for a General Page topic.
NOTE: Categories are optional but recommended especially if you have numerous General Page links.
A category is a way to sub divide a topic and allows users to filter all the General Page links by category.

-
General Page Topic: Select the topic the category will be a sub division of.
-
Category Name: Enter a name for the category. TIP: Add the topic name as either a prefix or suffix to the category name.
This way you will always know (just by looking at it) what topic the category belongs to when working with General Page links.
-
Click the (Create New General Page Category) button.
-
To create multiple General Page topics click the (Current General Page Category List) button.
-
Click the (New General Page Category) button and repeat the process.
|
|
To turn on one or more General Pages navagation bar tabs:
|
-
Click the (Patron Site Configuration Options) button.
-
Click the (Navigation Bar Tabs) button.
-
Click the (Public General Pages Tab Text) Tab.
-
If this is the first General Page you are setting up click the (General Tab 1) row of the table.
-
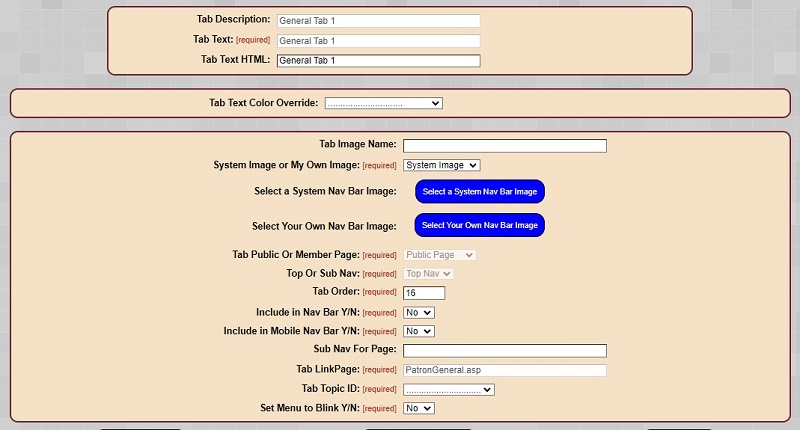
This is the page where you will enter the settings for the General Page nav bar.

-
Tab Text HTML: Enter the nav bar tab text. Use an HTML break (i.e. "br" with angle brackets <>) to get the tab text words to wrap where you want them to.
-
Tab Text Color Override: You may choose a text color if you like or leave it blank to use the default text color.
-
Tab Image Name: Enter a name for the nav bar tab.
-
System Image or My Own Image: Select if you want to use a pre-loaded systemimage or an image you upload yourself.
-
Tab Order: Enter the order number you want the tab to appear at. You can also reorder all the nav bar tabs using the [Public Pages Tab Text] page.
Simply set the order of the tabs in the right hand column of the table and clieck the (Reorder Tabs) button. You should leave a gap in the order
numbers to accomodate the General page tabs. For example if you are planning on using two General Page tabs and you want them in positions 5 and 6
your tab order on the [Public Pages Tab Text] page should be 1, 2, 3, 4, .... 7, 8, etc. Then on the individual General Tabs set thier order to
5 and 6.
-
Include in Nav Bar Y/N: Set to Yes if you want the General Page nav bar tab to appear when accessing the community on non-small devices such as desktop and laptop computers.
-
Include in Mobile Nav Bar Y/N: Set to Yes if you want the General Page nav bar tab to appear when accessing the community on small devices such as cell phones.
-
Sub Nav For Page: Leave blank.
-
Tab Topic ID: Select one of the topics you have created for the General Page.
-
Set Menu to Blink Y/N: If this is an important nav bar tab that you want to draw attention to you can set the tab text to flash or blink.
If you want to turn on this feature select Yes.
-
Click the (Save the Nav Bar Record) button.
|
|
Follow the steps below to setup a General Page link item:
|
-
On the main admin page click the (Setup a General Page Item) button.
-
Below are the descriptions of the fields: Name, Description, Display Type, General Page Topic, Category CodeID, Recurring or Non-Recurring.

-
Name:
Enter a name for the General Page item. This can be anything that is descriptive of the general page link.
This name will appear on the general page just below the image.
-
Description:
Enter a long description of the general page link.
This description will appear under the image on the general page and is for your users to read.
-
Display Type:
This drop down list provides choices of where the general page links will appear in Community Builder.
For most cases the [Patron and General] list item should be selected.
-
Club:
-
General:
-
Patron - Kiosk/Web:
-
Patron and General:
-
General Page Topic:
This drop down list displays all of the General Page topics you have setup.
-
Category:
This drop down list displays all of the General Page categories you have setup specifically for the topic currently selected in the General Page Topic drop down list.
If you change the General Page Topic drop down list selection the Category Code drop down list will refresh with the associated categories.
-
Recurring or Non-Recuring:
This indicated if the General Page link is a recurring or non-recurring event. For example if the General Page link referes to a weekly event you would select Recurring and if it is a one time event select Non-Recurring.
-
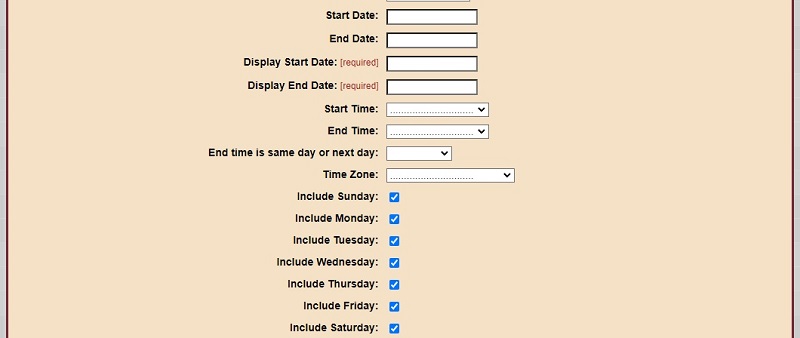
Below are the descriptions of the fields: Start Date, End Date, Display Start Date, Display End Date, Start Time, End Time, End Time is Same Day or Next Day, Time Zone, Include Week Days.

-
Start Date:
This indicates the start date of the General Page link item.
For example if it is an event then it is the start date of the event.
-
End Date:
This indicates the end date of the General Page link item.
For example if it is an event then it is the end date of the event.
-
Display Start Date:
This indicates the start date the General Page link item will be displayed on the page.
-
Display End Date:
This indicates the end date the General Page link item will be displayed on the page.
After the Display End Date the General Page link item will no longer appear in the list.
-
Start Time:
This indicates the start time of the General page link item such as an event.
-
End Time:
This indicates the end time of the General page link item such as an event.
-
End time is same day or next day:
This indicated if the end time of the General Page link item ends on the same day or sometime after midnight the next day.
-
Time Zone
Indicates the time zone the General Page link item is occurring in. This is mostly for event type links.
-
Indicated the days of the week the General Page link items is to be displayed.
In most cases all of the week days should remain "checked".
-
Include Sunday:
-
Include Monday:
-
Include Tuesday:
-
Include Wednesday:
-
Include Thursday:
-
Include Friday:
-
Include Saturday:
-
Below are the descriptions of the fields: Image Width, Image Height, Adjust Image Width to, Image Name, Image Path, URL, Active.

-
Image Width:
Leave this field blank initially since you can use the (Get Image Dimensions) button to get the height and width values once the file has been uploaded.
-
Image Height:
Leave this field blank initially.
-
Adjust Image Width to:
Leave this field blank initially. Once the image has been uploaded you can use this selection to adjust the image display height and width while maintaining the correct aspect ratio.
-
Image Name: This field is non-editable.
-
Image Path: Choose File
Click the (Choose File) button and navigate to the image you want to use for the General Page item. Select it and click Open.
-
URL:
Copy and paste the URL from your browser to where the General Page link should redirect the user to when they ckick on the image.
-
Active:
Use the Active check box to easily turn the General Page link on or off from appearing in the list on the page.
-
WITHOUT filling in the Image Height or Image Width fields click the (Create New Menu Item) Button.
-
Click the (Upload Image) Button. Navigate to the image file to upload and click the (Upload) button.
-
Click the (Finished) Button.
-
Now that the image has been uploaded click the (Get Image Dimensions) button. This should fill in the Image Height and Image Width edit fields.
-
From the [Adjust Image Width to:] drop down list select the number of pixels you want to adjust the image width to.
-
Click the (Save) Button.
-
Open a browser and navigate to the home page of your community.
Look for the General Page nav bar tab and click on it to check that the General Page is displaying your topic links correctly.
If you have added categories select a category and check to make sure it filters the list of links on the page.
If it's not filtering the list check to make sure each General Page link item has the correct category selected in the [Category CodeID:] drop down list.
Save the General Page link item again and refresh the page.
|