Promotional E-mails Lists
|
|
Did you know you can setup numerous e-mail lists that you can manually add/edit/delete e-mails from the lists and send promotional e-mails to any of the lists your create.
|
For all of these tasks you will first need to:
-
Login to your Community Builder admin account.
|
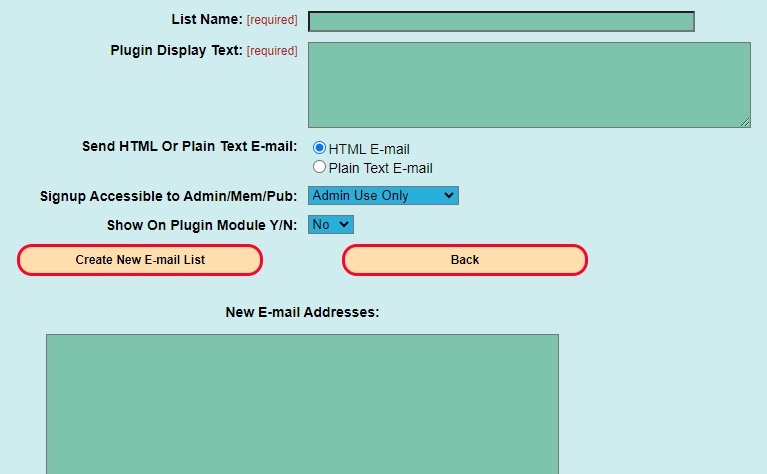
Create a new promotional e-mail list.
-
Click the (E-mail and Segmentation Admin) button.
-
Click the (Setup an E-mail List) button.
-
Click the (Build an E-mail List) button.

-
Enter a list name.
-
Plugin Display Text: Leave this field empty.
-
Signup Accessible to Admin/Mem/Pub: Select: Admin --> Community administrative access only
-
Show On Plugin Module Y/N: Select No
-
E-mail lists must have at least one e-mail address to get created so enter an e-mail address into the [New E-mail Addresses:] text area. A good idea is to add your own e-mail address
to the list so when you send out e-mails to a list you can verify that the e-mails are being sent since you should also receive an e-mail.
-
Click the (Create New E-mail List) button.
-
Click the (Back to E-mail Admin Sub-Panel) button.
-
Remember, you can create multiple e-mail address lists for sending promotional e-mails to.
|
Add additional e-mail addresses to the list.
-
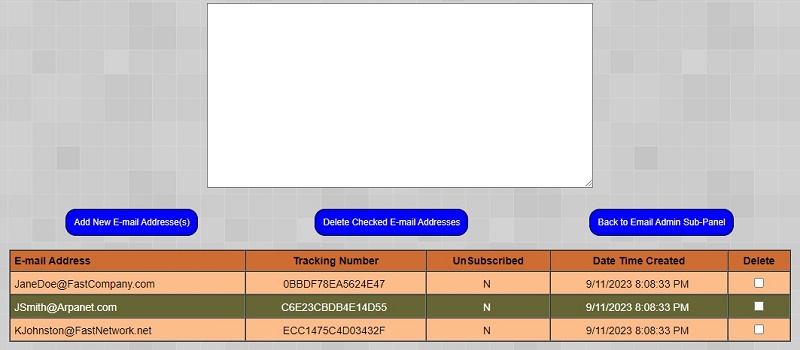
You can add many e-mail address to each list by pasting a comma delimited list e.g. JSmith@Arpanet.com, KJohnston@FastNetwork.net, JaneDoe@FastCompany.com into the text area field.
NOTE: Each list has a limit to the number of e-mail addresses it can store and this limit depends on your current e-mail plan.
-
Click the (Add New E-mail Addresses) button.
-
This will parse all of the e-mail addresses and check them for valid format.
If any of the e-mail addresses have an invalid format an error message will be displayed which helps you identify the bad e-mail addresse(s).
Here are a few examples:


-
Once all e-mail addresses have the correct e-mail format the e-mail addresses will be inserted into the database and all of the inserted e-mail addresses will appear in a table below the text area the text area will be cleared.

-
To delete any individual or multiple e-mail addresses place a check mark next to the e-mail address and click the (Delete Checked E-mail addresses) button.
|
Delete an e-mail list.
-
To delete a e-mail list and all of the e-mail addresses it contains.
-
From the main e-mail admin panel click the (Lookup E-mail List to Delete) button.
-
Select the e-mail list from the drop down list and click the (Delete) button.
-
Click the (Back to E-mail Admin) button.
|
Remove duplicate e-mails from an e-mail list.
-
To remove duplicate e-mails from an e-mail list.
-
From the main e-mail admin panel click the (Lookup E-mail List to Remove Dups) button.
-
Select the e-mail list from the drop down list and click the (Check for Duplicates) button.
-
If any duplicates are found they will be displayed in a table. Click the (Remove Duplicate E-mail Addresses) button.
|
Cross check two e-mail lists for duplicate e-mails in the lists.
-
To cross check two e-mail lists for duplicate e-mails that exist in both lists and remove duplicates from one of the lists.
-
From the main e-mail admin panel click the (Select Multiple E-mail Lists to Remove Dups) button.
-
Place a check mark next to two e-mail lists and click the (Show Duplicate E-mail Addresses) button.
-
If any duplicate e-mail addresse(s) are found they will be displayed in a table.
Select the list from which you wish them to be removed and click the (Remove Duplicate E-mail Addresses) button.
|
Split an E-mail List into two separate e-mail lists.
-
When one e-mail list becomes too large it is helpful to split the list into two separate e-mail lists.
-
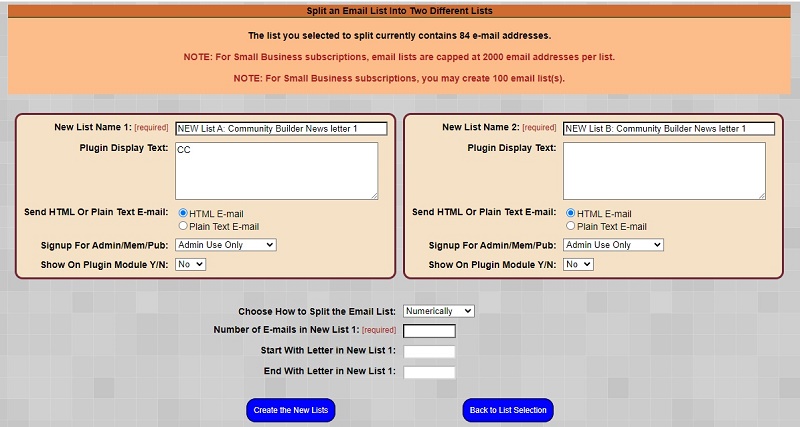
From the main e-mail admin panel click the (Split an Email List) button.
-
Place a check mark next to the e-mail list you wish to split into two separate lists.
-
Click the (Splist Selected List) button.
-
Just as in setting up an e-mail list enter the information for the two new lists. You can choose to split the list either numerically or alphabetically.
-
Numerically: Split the list by specify the number of e-mail to be included in the first list and the rest will be added to the second list.
Enter a value in the [Number of E-mails in New List 1:] field.
-
Alphabetically: Split the list by specifing the letter of the alphabet to break the list at.
Enter values in the [Start With Letter in New List 1:] and [End With Letter in New List 1:] field.

-
Click the (Create the New Lists) button.
-
NOTE: This action creates two new e-mail lists. You then need to manually delete the original list that was split.
|