Image Themes
|
|
Did you know you can you can setup image themes to make a visual impact with your community.
|
For all of these tasks you will first need to:
-
Login to your Community Builder admin account.
-
Click the (Themes and Color Maintenance) button.
|
|
Setup an image theme type:
|
-
Click the (Image Theme Types) button.
-
Notice that the system contains a variety of pre-populated image theme types such as:
4th of July
Christmas
Earth Day
Easter
First Day of Spring
Halloween ...
However, you can also add your own image theme types if the system does not have what you need. For example you may want to add
an image theme type for your specific business. Before you add an image theme you should add the image theme type(s) you need so
they will appear as a choices in the drop down list when adding new image themes.
-
Click on the (New Client Image Theme Type) button.
-
Enter the name of the image theme type. An example might be Flag Day.
-
Click on the (Create New Image Theme Type) button to create the new image theme type.
|
|
Setup an image theme:
|
-
From the main colors and themes admin page click on the (Image Themes) button.
-
Click the (New Client Image Them) button.

-
Select the new image theme type from the [Image Theme Type:] drop down list.
-
Click the (Choose Image) button to select the image you want to add as an image theme.
NOTE: You can use a static jpg image but typically image themes use animated gif images to add a dynamic images to your community pages.
-
Enter a value for the image height and width. Don't be too concerned about seeting the exact values for the image since once the image has been uploaded
you can use the (Get Image Dimensions) button to automatically get the correct values. NOTE: You must first upload the image before the button will be
able to get the image dimensions.
-
The remaining fields are optional so for now click the (Create New Image Theme) button to create the record.
-
Click the (Upload an Image) button. Click the (Choose Files) to navigate to the image, select it and click Upload.

-
Click the (Finished) button.
-
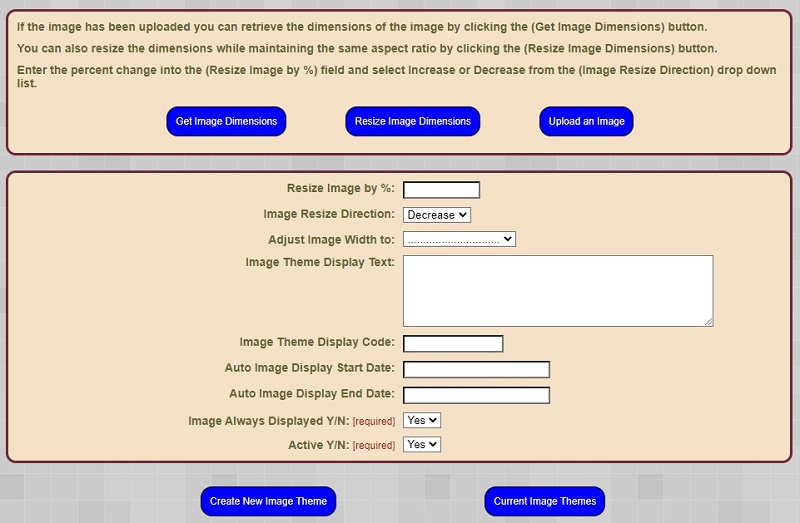
Once the image has been uploaded click the (Get Image Dimensions) button. This should populate the [Image Width In Px] and [Image Height In Px] fields
with the values retrieved directly from the image.
-
Often times the image is too big for display purposes so the image needs to be reduced in size but also maintain it's aspect ratio. You can use the
(Resize Image Dimensions) button along with the [Resize Image by %:] and the [Image Resize Direction] fields to adjust the image dimensions to the required size.
-
Alternatively, if you have the correct image height and width values (but they are too large for proper display) you can select a value from the
[Adjust Image Width to] drop down list and it will set the size of the image width to the value selected and this will also adjust the image height propotionally.
-
Click the (Save Image Theme) button.
-
If you want to also display text along with the image you can enter the text in the [Image Theme Display Text:] field. You can use HTML font tags to adjust
the font family, size, and color of the text in the text field.
-
The [Active Y/N:] selection allows you to show/hide the image theme regardless of the other settings such as [Image Always Displayed Y/N:] or the [Display Start and End Dates] settings.
-
The [Auto Image Display Start Date:] and the [Auto Image Display End Date:] can be populated with valid dates to get the image thems to appear only
during the date range specified. This is great for adding images thems to your community for holidays such as Halloween or Christmas.
-
By setting the [Image Always Displayed Y/N:] to Yes it will override the auto date range and assure the image theme is always displayed unless it is set as inactive.
|
|
Display an image theme:
|
-
Once you have setup an image theme it needs to be applied on one or more pages of your community. In fact an image theme can be
applied to multiple pages, in multiple columns of a community page.
-
To apply an image theme to a page within your community use the following steps.
-
Login to your Community Builder admin account.
-
Click the (Patron Site Configuration Options) button.
-
Click the (Patron Account Config. Plugins) button.
-
Click on the page name you want to have the image theme appear on, for example PatronHome.asp.
-
Click on the row that represents the column you want the image theme to appear in i.e. ImageThemeLeftCol, ImageThemeCenterCol, or ImageThemeRightCol.
-
Select Yes in the drop down list of the column you want the image theme to appear in.
-
Set the order number you want the image theme to appear in that column (0 is the top position and higher numbers appear lower in the column).
-
Select the image theme from the [Theme Image ID:] drop down list.
-
Click the (Save Plugin Module Name) button.
-
Refresh the community page you applied the image theme plugin module to. You should see the image theme appear.
-
If the image theme does NOT appear check to make sure the image theme is active and the [Image Always Displayed Y/N:] drop down list is set to Yes
or there are valid dates in the [Auto Image Display Start] and [Auto Image Display End Date] fields.
|