Custom HTML Pages
|
|
Did you know you can create your own 100% custom HTML page that can be integrated with your community?
|
For all of these tasks you will first need to:
-
Login to your Community Builder admin account.
-
Click the (Patron Site Configuration Options) button.
-
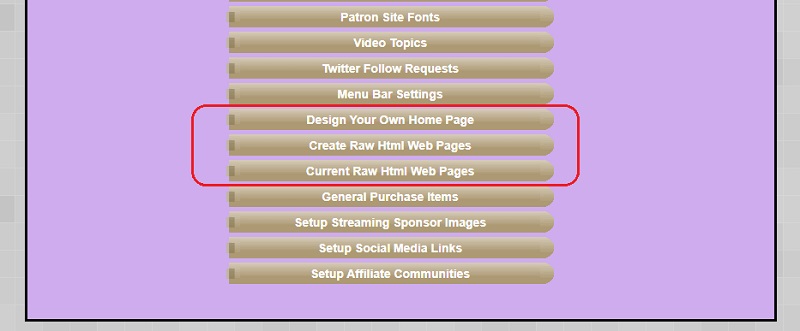
From this admin panel the following buttons are used for creating custom HTML pages:
-
Design Your Own Home Page
-
Create Raw Html Web Pages
-
Current Raw Html Web Pages

|
Create a community home page: If you prefer to have a website home page as the landing page for your community you can use this option to create a home page with a link to your community.
When you start a community with Community Builder you get a free domain name. This domain name is typically a short name that you can send to potential community members to make it easy for them
to remember and get to your community. You can choose to point this domain name to either your community landing page or your custom web page.
-
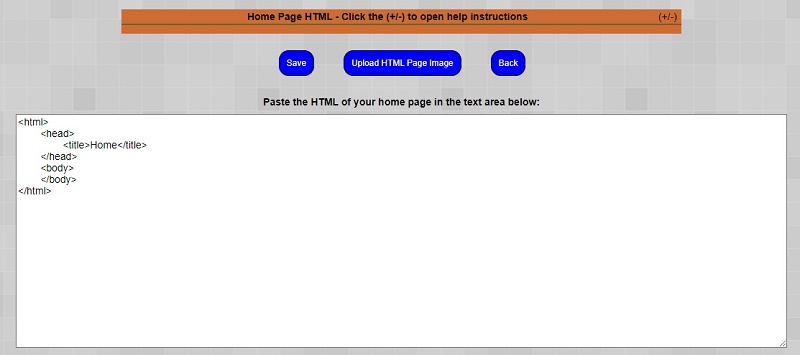
Click on the (Design Your Own Home Page) button.
-
Enter the HTML for your community home page. It's a good idea to include a link to your community somewhere on your home page.
That link will be:
https://YOUR_COMMUNITY_NAME.communitybuilder.live/CommunityBuilder/HomePages/PatronHome.asp
-
Click the (Save) button.
-
The URL for your new home page will be:
https://YOUR_COMMUNITY_NAME.communitybuilder.live/CommunityBuilder/HomePages/Home.asp
-
Copy and paste the URL into a browser to view your custom HTML page.
|
IMPORTANT NOTES:
-
If you are writing an HTML page (and not a CSS or html segment) your Html should start with an (html tag) and end with an (end html tag).
For information about CSS and HTML segments see below.

-
Writing code is an iterative process so we recommend you write the HTML code in a code editor (e.g. Visual Studio Code - FREE) then when ready to deploy the page copy and paste your code into the text area of the page.
Using a code editior allows you to save your HTML as a file before entering it to Community Builder. This also acts as a backup of your code pages.
-
It's very likely you will want to make changes to your code and view those changes before commiting those changes to your Community Builder custom page.
Since these pages are HTML pages you can keep a link to your local code file in the code itself as a comment and use it to view your changes locally before deploying them to Community Builder. Just copy and paste
the link into a browser to view your page changes.

-
All images to be displayed on your html pages should be uploaded using the (Upload HTML Page Image) button below.

-
When displaying an image in your home page use the following example to define where the image is stored.
src='https://CommunityBuilder.communitybuilder.live/CommunityBuilder/Assets/Client/3100/Images/HtmlPageImages/ImageName.jpg'
Copy this path exactly and then only edit the image name and extension. Community Builder will take care of the rest.
For example, if your image name is 'MyGraduation_01_01_2021.jpg' the path should be as follows:
src='https://CommunityBuilder.communitybuilder.live/CommunityBuilder/Assets/Client/3100/Images/HtmlPageImages/MyGraduation_01_01_2021.jpg'
|
Create a new custom HTML page:
Creating a custom HTML home page is just the beginning. The custom home page is slightly different in that it has a fixed URL to ...Home.asp.
However, you can create other custom html pages that you can link to from anywhere.
-
From the [Patron Site Config Options] sub admin panel click the (Create Raw Html Web Pages) button.

-
Enter a page title for the HTML page.
-
Clear the text area field then paste in your HTML code.
-
Click the (Create New Web Page) button.
-
When the system saves your HTML code the Page URL field will be populated with a URL that points to your page. You can copy and paste
the URL in any web page to open your Community Builder page.
NOTE: Often the actual text of the URL extends beyond the end of the text field so be sure to select all of the text by TRIPLE clicking in the URL text field.

-
To view all of your saved HTML pages click the (Back to HTML Pages) button.
|
Use an iFrame with an HTML segment:
Often there is some common content you want to include in many pages. The use of an iFrame makes this much easier. An example use case may be
a side bar menu or a top menu that needs to be included in many pages. If you write the HTML for the menu you can use it to create an HTML segment
then use the URL generated to that HTML segment in an iFrame tag to include the HTML segment in many pages. This has the advantage of only having to maintain
one copy of the menu. If you change the menu HTML segment it instantly updates the changes in evey HTML page it's included in.
* HTML segment - not a full HTML page beginning with "< html >" and ending with "< /html >" but just a syntacially correct block of HTML code.
-
Here is an example of the use of a link to an HTML segment include in a iFrame.

|
Use a Stylesheet:
Cascading style sheets are the best way to style your HTML pages and at the same time only have one copy of your CSS code.
You can create a CSS as an HTML segment (that only contains CSS code) then use the generated link to the CSS in all of the pages you write.
-
Here is an example of using an HTML segment (that only contains CSS code) in your HTML pages.

|
Delete a Custom HTML Page: To delete any of the HTML pages you have created do the following.
-
From the [Patron Site Config Options] sub admin panel click the (Current Raw Html Web Pages) button. This will open a page that lists all of your HTML pages.
-
Place a check in the box to the right of the page to delete.
-
Click the (Delete Web Page(s)) button.
|