Creating Galleries
|
|
Did you know you can create galleries of images for all of the projects you are working on?
|
For all of these tasks you will first need to:
-
Login to your Community Builder admin account.
-
Click the (Setup a Public Gallery) button.
|
Create a new gallery:
-
Click the (New Community Gallery) button.

-
Enter a gallery name. This is the only required field to create a new gallery.
-
Click the (Create New Gallery) button.
-
It is recommended that you fill in some of the optional fields and choose some of the other available options.
-
Generic Short/Long Description:
If you do not want to enter individual short and long descriptions for all of the images to be added to the gallery the
[Generic Short/Long Description:] allows you to add a common text for both the short and long description of the image
that will be added for each one when you save the images to the gallery.
-
Gallery Page Header:
Add the header text for the main gallery page.
-
Sub Directory Name:
If you would like to place all of the images for each gallery into their own separate folder enter the folder name and
the system will create the folder for you.
-
Public Gallery Y/N:
Select if this gallery is available to the public.
-
The Active Gallery Y/N:
You can toggle the gallery from being visible or not by setting the active status.
-
Show Page Header Y/N:
Set if the gallery header text should be displayed or not.
-
Adjust Display Image Width To:
This adjusts the width of the "single" image when displayed.
-
Adjust Thumbnail Image Width To:
This adjust the width of all the smaller thumbnail images displayed.
-
New Image Border Color:
If this is a gallery that you are actively adding new images to this will set the border color of
the new images added to the gallery for 7 days. After 7 days the boder will become the color set
by the [Old Image Border color].
-
Old Image Border Color:
This is the border color of images in the gallery after they have been in the gallery for more than 7 days.
-
Border Width:
Set the border width of the gallery images.
-
Border Style:
Set the border stype of the gallery images.
-
Number of Columns to Display:
Set the number of columns the gallery thumbnail images should be displayed with.
|
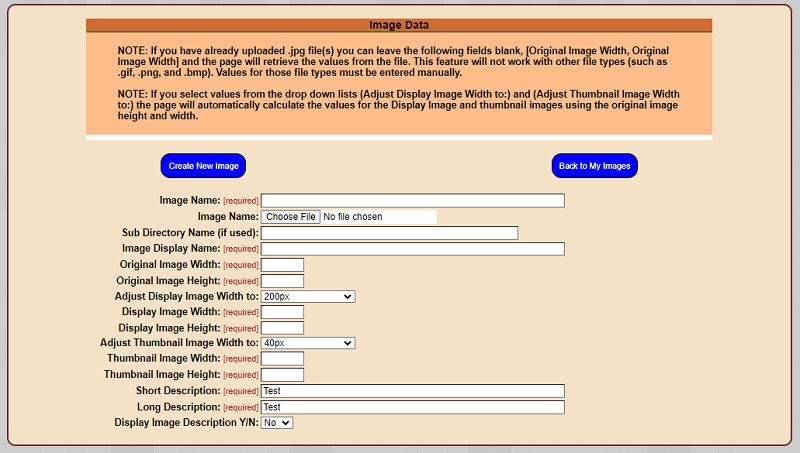
Adding one image to the gallery:
-
Click the (Add 1 Gallery File) or the (Add Multiple Jpg Files) button.
-
If you select the (Add 1 Gallery File) button you will have more fields to complete.
The thought behind this is that if you are entering one image at a time you want to specify a number of details about the image.
However, if you read the header text on this page there are ways to speed up the entry of the information about a single image.

|
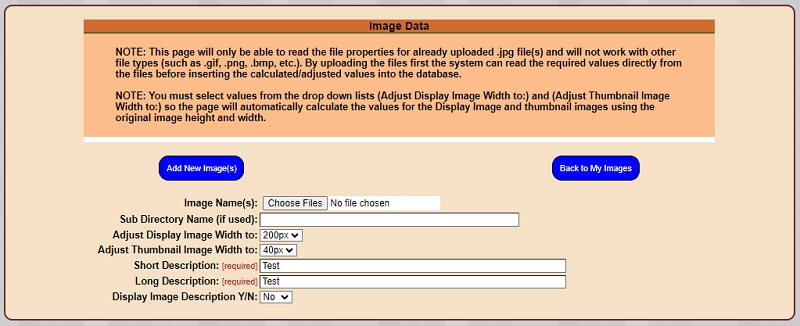
Adding multiple images to the gallery simultaneously:
-
Click the (Add Multiple Jpg Files) button.
-
If you select the (Add Multiple Jpg Files) button you will have fewer fields to complete.
The thought behind this is that if you are entering multiple images simultaneously you will
want to take advantage of the options to fill in fields automatically.
If you have entered a value for the [Generic Short/Long Description:] on the gallery setup page it will automatically fill in those
values for you.
If you created a separate folder for the images in this gallery then enter that folder name. When adding the multiple images
it will place them in the folder name you specify.
You also have the option to override the settings for [Display Image Width] and [Thumbnail Image Width].

-
Click the (Choose Files) button. You can use the Ctrl key or the shift key to select multiple images.
-
Click the (Add New Image(s)) button.
|
Make the gallery available on the public gallery page:
-
Open the gallery and make sure the [Public Gallery Y/N:] is set to Y.
-
Make sure the [The Active Gallery Y/N:] is set to Y.
-
From the main admin page click the (Patron Site Configuration Options) button.
-
Click the (Navigation Bar Tabs) button.
-
Set the [Filter By:] drop down list to "Include in Web Nav Bar = N". This will display all records NOT currently in the nav bar.
-
Click the table row with the description "Community Galleries".
-
Set the [Include in Nav Bar Y/N:] to Y and enter the order number in which you want the Gallery tab to appear.
-
Click the (Save Nav Bar Record) button.
-
Refresh your community home page and the Community Galleries tab should appear in the nav bar.
-
For more information about setting Nav Bar records:
Click Here
|
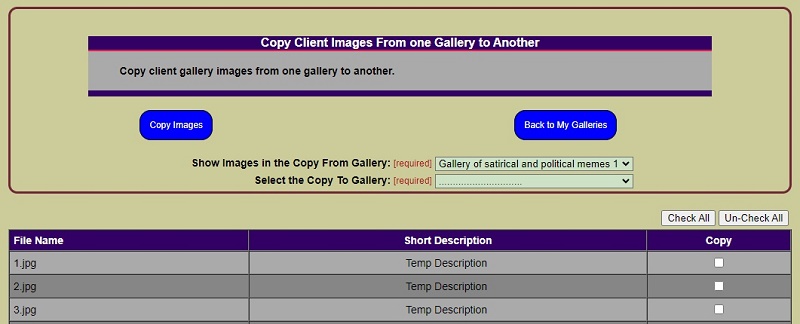
Copy images from one gallery to another:
-
From the main admin for galleries click the (Copy Files to a Gallery) button.

-
From the [Show Images in the Copy From Gallery:] drop down list select the gallery you want to copy file(s) from. This will
populate the table with all of the images in that gallery.
-
From the [Select the Copy To Gallery:] drop down list select the gallery you want to copy the file(s) to.
-
Place a check mark next to the files you want to copy.
-
Click the (Copy Images) button.
|
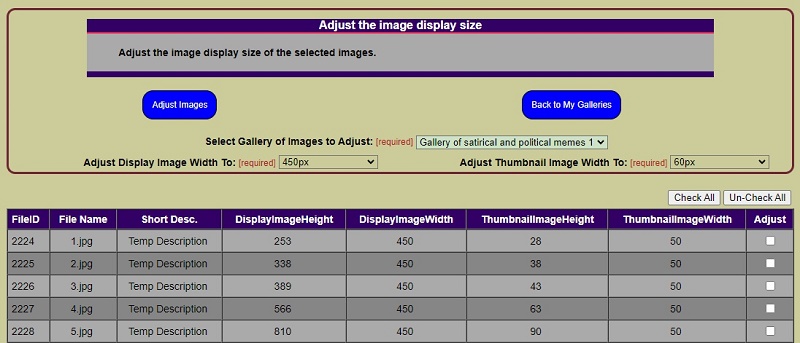
Adjust the display sizes of images in galleries:
-
From the main admin for galleries click the (Adjust Gallery Image Sizes) button.

-
From the [Select Gallery of Images to Adjust:] drop down list select the gallery you want to adjust the image display sizes.
-
NOTE: A selection from only one of the drop down lists specifying a width is required.
-
From the [Adjust Display Image Width To:] drop down list select the width the image should be displayed at.
-
From the [Adjust Thumbnail Image Width To:] drop down list select the width the thumbnail image should be displayed at.
-
Place a check mark next to the file(s) you want to adjust.
-
Click the (Adjust Images) button.
|