Community Builder Membership Settings
|
|
Did you know you can setup the membership of your community in several different ways?
|
For all of these tasks you will first need to:
-
Login to your Community Builder admin account.
-
Click the (Patron Site Configuration Options) button.
-
Click the (Patron Account Config. Options) button.
-
Click the (Business Items) tab.
|
You can setup the membership of your community as either FREE or PAID.
|
-
To setup membership as FREE set the [This is a Paid Membership Community:] drop down list to No.
-
To setup membership as a PAID membership set the [This is a Paid Membership Community:] drop down list to Yes.
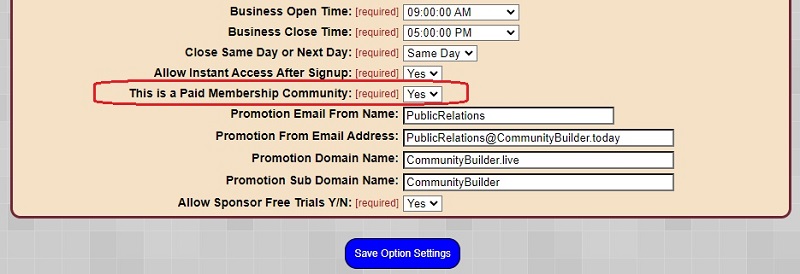
NOTES:
-
If community membership is setup as a PAID membership you will need to setup the payment processor (Stripe.com or PayPal.com) payment links with the amount you want to charge.
-
To do that you first must have either a Stripe.com or a PayPal.com account or both since different payment processors can be used for different e-commerce items throughout Community Builder.
-
Once you have your Stripe.com or PayPal.com accounts setup click the link below for instructions on how to setup payment links:
Click here for payment link help
-
After your payment processor links have been created you will need to setup the links in Community Builder for the membership sigup process.
-
From the Community Builder main admin page click the (Client Account Configuration Options) button.
-
Click the (Payment Processor Code Admin) button.
-
Click the (Payment Processor Code Admin) button.
-
Click the (Member Subscription Payment Codes) button.
-
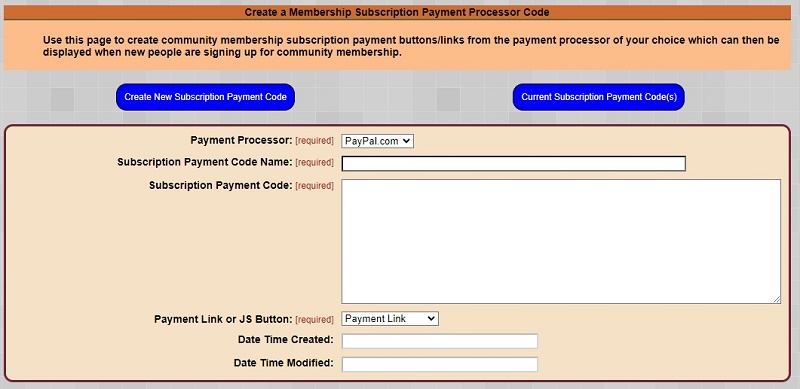
Click the (Setup Subscription Payment Codes) button.
-
Select if this is a PayPal.com or Stripe.com account payment code.
-
Enter a name in the [Subscription Payment Code Name] field.
-
Copy and paste the payment code generated in your PayPal.com or Stripe.com account into the [Subscription Payment Code] field.
-
Select if this is a payment link or a JavaScript code button.
-
Click the (Create New Subscription Payment Code) button.
|
You can setup the membership of your community to allow instant access to a new account (after verifying their e-mail address)
or prevent access until a new account can be reviewed and APPROVED.
|
-
To setup membership with instant access to an account set the [Allow Instant Access After Signup:] drop down list to Yes.
-
To setup membership to require a new account be APPROVED set the [Allow Instant Access After Signup:] drop down list to No.
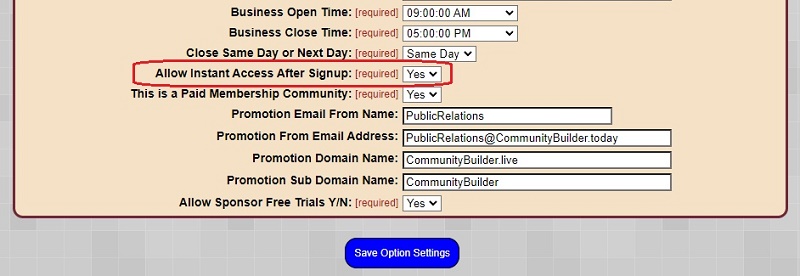
-
NOTES (Instant account access):
If community membership is setup with instant access to a new account a user will be able to login to their membership account immediately
after completing the signup form and verifying the e-mail address they used on the signup form.
Once a new member completes the signup form they will receive a welcome e-mail with a link to
verify the e-mail address they used during signup. Once clicked it will open a thank you page with another link to the community
home page where they can login to their membership account.
-
NOTES (Account approval required):
If community membership is setup with APPROVAL required, each new user account must be manually approved by an administrator before a new member is able to login.
Once the signup form is completed the member is re-directed to a page that informs them the first part of the signup is complete and that their account is now waiting to be approved.
Once approved by an administrator they will receive an e-mail with a link to the page where they can login to their membership account.
|
Account approval process for a FREE account with APPROVAL required.
|
-
Below is the message the user will see once they complete the signup page.

-
Below is the e-mail the user will receive after completing the signup page:
Dear Blake Mann,
Thank you for registering with Community Builder.
We are working to setup your account and will soon send you a follow-up email.
Sincerely Yours,
The Community Builder Staff
P.S. The User Name you entered during registration is shown below:
Your Account Name - Blake
You may request a password reset by clicking "Password Help" from the log in screen.
|
-
The administrator will also receive an e-mail that lets them know a new member has completed the signup page and needs to be approved.
A new member signup occurred.
UserName: Blake
First Name: Blake
Last Name: Mann
Email Address: bmann@continuumsoftware.com
-
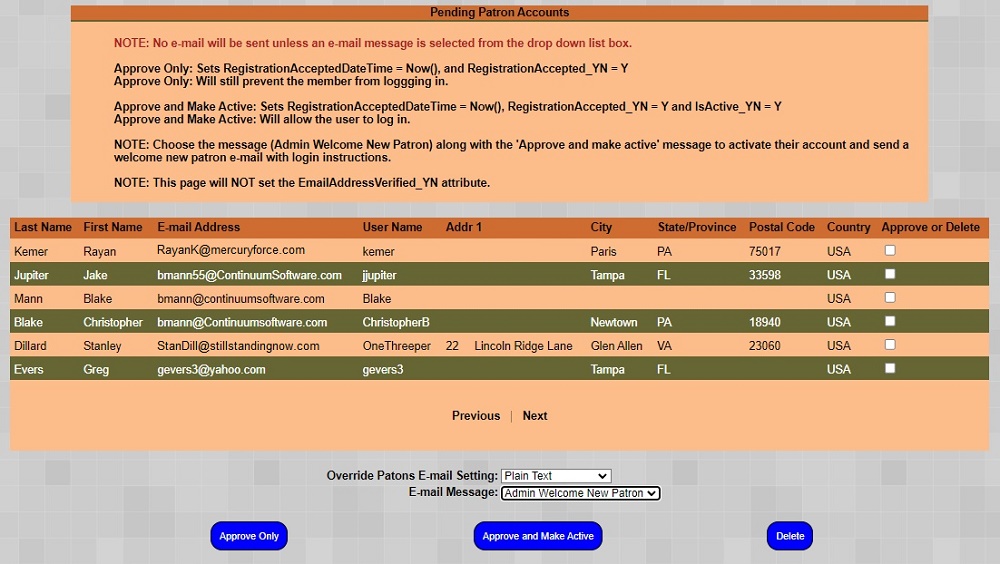
Below is the new member approval page. For each new member a community administrator must review the members information and make a decision
to approve the new member or not. If it is determined the new member is to be approved the administrator will use the page below to approve the member.
To approve a member and allow them to sign in to the community they must do the following:
-
Place a check mark in the right column next to the new member to be approved
-
Select the "Admin Welcome New Member" from the [E-mail Message] drop down list box.
-
Click the (Approve and Make Active) button.
-
Below is the e-mail the user will receive after their membership has been approved:
Dear Blake Mann,
Let me be the first to welcome you to: Community Builder. Your account Information is shown below.
Your account has been verified. You are now able to login and start networking with others.
Click here to log in
Be sure to visit our website often to check out the new member projects and check the list of events.
Again Thank your for becoming a member of Community Builder
Sincerely,
Staff at Community Builder
Your Account Name - Blake
You may request a password reset by clicking "Password Help" from the log in screen.
|
|
Account creation process for a FREE account with INSTANT ACCESS.
|
-
Below is the message the user will see once they complete the signup page.

-
Below is the e-mail the user will receive after completing the signup page. The e-mail includes a link to validate the e-mail the user entered on the signup page:
Dear Blake Mann,
Let me be the first to welcome you to Community Builder.
Please verify your e-mail account by clicking on the link below. Once you have verified your e-mail address you will be able to login and start networking with other members.
Click here to verify your email address
Sincerely
The Staff at Community Builder
Your account Information is shown as follows.
Your Account Name - Blake
Your may request a password reset by clicking on "Password Help" from our log in screen.
You may also change your username once you are logged in.
|
-
The administrator will also receive an e-mail that lets them know a new member has completed the signup page.
A new member signup occurred.
UserName: Blake
First Name: Blake
Last Name: Mann
Email Address: bmann@continuumsoftware.com
-
Once the member vlaidates their e-mail address they are able to login to the community using the Login Module typically placed on the
community home page near the top in either the left, center or right column.
Below is the message the user will see once they validate their e-mail address.

|
You can set which signup fields are displayed and which fields are required.
|
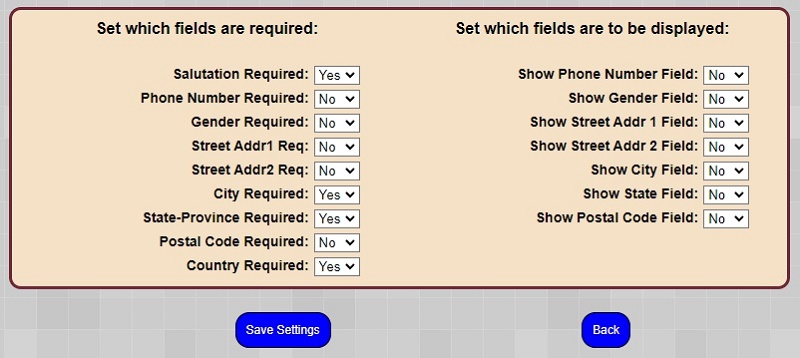
While you have control over which signup fields are displayed and required keep the following in mind:
-
You can not require a field that is not displayed (obvious but mistakes can be made).
-
In addition to promotional e-mails being sent to stored lists of e-mail addresses they can be sent to "segmentation groups" of your community members.
Segmentation groups are non-stored lists of members with the same properties such a gender and age range but can also be based also on location properties such as
country, city, state and postal code. In addition to segmenttation groups which use location information the member connection module software runs daily and
attempts to match members based on their interests but also includes their location in the algorythm.
Therefore, if you want to take the greatest advantage of the segmentation groups and the member connection module it is helpful to require more information related to a
member's location such as country, city, state and postal code. This is a balancing act because if you require a lot of location information on signup people
may decide that it is too much personal information to provide and decide not to signup. You may want to start with only requiring less specific location information
such as country and state then later encourage members to edit their account with more specific location information if they are interested in receiving location
specific e-mails or participating in the member matching program.
|
Utilizing the Patron Loyalty Module.
|
-
There is a patron loyalty module built into Community Builder and part of that module includes code that runs everytime a member logs in.
This assigns points to their account for logging into the community daily.
However, if you are NOT going to use the patron loyalty module you can bypass the code that runs when a member logs in which speeds things up.
By default the patron loyalty login code is bypassed so if you want to include it select Yes in the [Run Loyalty Code on Login] drop down list
then click the (Save Options Settings) button.

|