Setup Donation Buttons
|
|
Did you know you can add donation buttons to the donations plugin module and add the module to
almost any page of your community.
|
For this task you will first need to:
-
Login to your Community Builder admin account.
-
Click the (Client Account Configuration Options) button.
-
Click the (Payment Processor Code Admin) button.
-
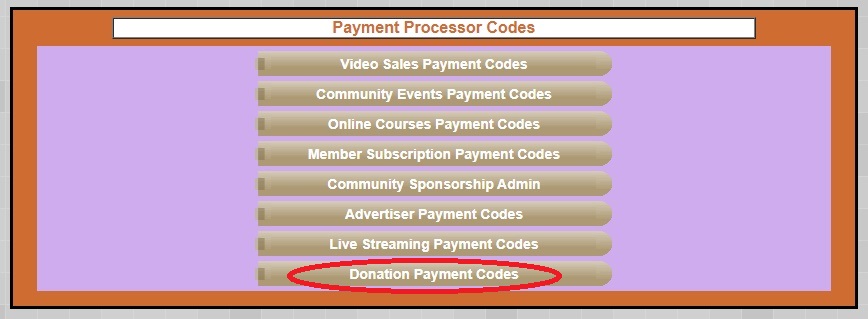
Click the (Donation Payment Codes) button.
|
|
Add your donation codes from the payment processor of your choice (PayPal.com, Stripe.com).
These can be either the older style JS buttons or payment links. For more information
on creating payment links
Click here
|
-
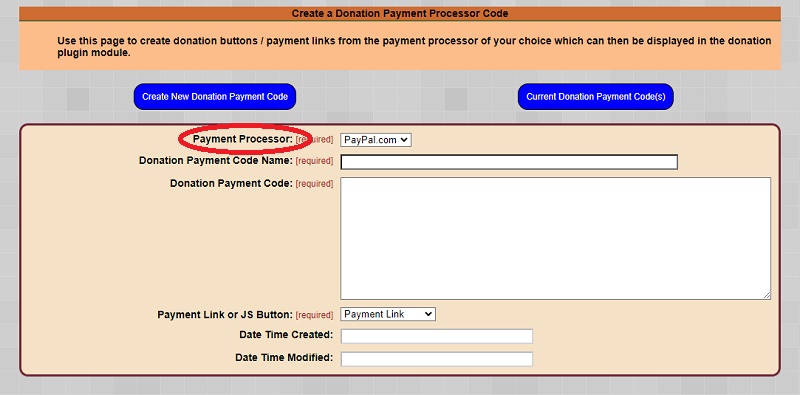
Click the (Setup Donation Payment Codes) button.

-
Choose the payment processor you used to create the donate button or payment link.
-
Give this donation button/link a name. This can be anything you like to help identify the donation button/link.
-
Copy and paste the donation button JS code or payment link.
-
Select if this is a JS button or a payment link.
-
Click the (Create New Donation Payment Code) button.
-
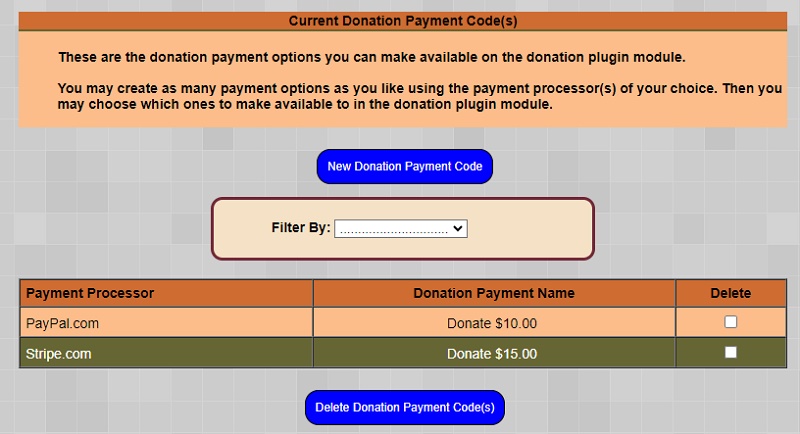
Click the (Current Donation Payment Code(s)) button to see all of your donation payment codes.
-
To create another donation payment code click on the (New donation Payment Code) button.
-
To delete an existing donation payment code place a check mark in the box to the right of the donation code you
wish to delete and click the (Delete Donation Payment Code(s)) button.
-
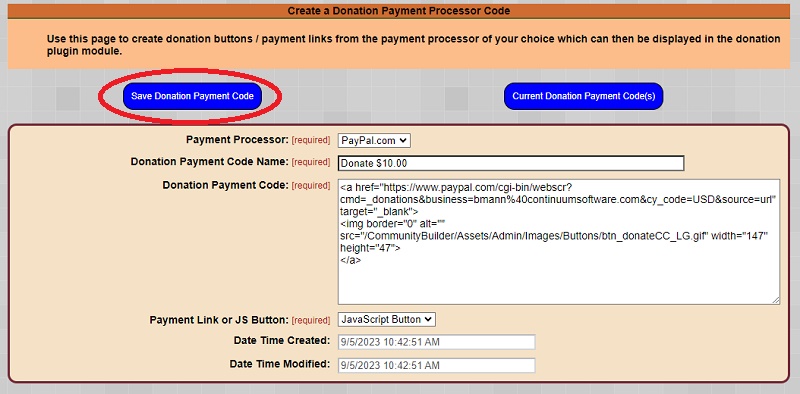
To edit an existing donation code click the donation code row item you wish to edit. Make your changes and then
click the (Save Donation Payment Code) button.
|
|
Add your donation payment codes to the donation plugin module. Then turn on the donation plugin module and select the
column and position of the module.
|
To find the page you want to add a plugins on:
-
Open your community home page.
-
Navigate to the page you want to add the plugin module(s) to.
-
Look at the URL in your browser. If the URL is too long to see all of it double click on the url to select all of it then copy and paste it into a note pad file.
-
Look for the page name ending in ".asp" to the far right of the URL you copied.
-
Example: For the home page the URL should look similar to:
https://communitybuilder.communitybuilder.live/CommunityBuilder/HomePages/PatronHome.asp
The page name you are interested in is (PatronHome.asp)
-
Look for this name in the table of results once you clicked the (Patron Account Config. Plugins) button - see below.
-
This will be the row item you select in the next step.
|
To add a plugin to the page:
-
If not already logged in, login to your Community Builder admin account.
-
Click the (Patron Site Configuration Options) button in the lower right quadrant.
-
Click the (Patron Account Config. Plugins) button.
-
In the table of results [Publicly Available Pages] select the row matching the name of the page you wish to add the plugin module to from the previous step.
-
Select the column you want to add a plugin from using the "Filter on Column" drop down list box.
-
Select "Left column = N" or "Right column = N" or "Center column = N".
This will display the plugins NOT currently appearing in the specified column.
-
Click on the row that specifies the plugin module you want to turn on.
-
Change No to Yes in the Include In Column Y/N:
-
Click (Save Plugin Module Name).
-
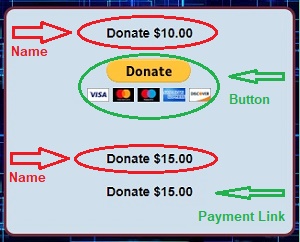
Refresh your community page that you added the plugin module to. You should see the one
or more donation buttons/links you previously added.
|